
Why This Feature Matters
Facebook Lead Ads are a powerful way to capture new leads, but those leads only become valuable if they flow into the right place in your CRM.
Sierra uses Lead Routing Rules to determine how incoming Facebook leads are assigned, tagged, or routed. Testing the connection ensures your setup works before real leads start coming in.
Table of Contents
Before You Begin
Before testing your Facebook Lead Ads connection, make sure:
- Your Facebook Lead Ad form is already created
- Your Sierra account is connected to Facebook
- You have access to Lead Routing Rules in Sierra
Testing uses sample leads, not real people.
Step-by-Step Instructions
Step 1: Open Facebook’s Lead Ads Testing Tool
Facebook provides a built-in tool to send test leads from your form.
- Go to: https://developers.facebook.com/tools/lead-ads-testing
- Log in to the Facebook account that manages your Lead Ads.
Step 2: Prepare a Test Lead
To ensure Sierra recognizes a new test lead:
- Think of a Lead Name that is not already in your lead database, including phone number and unique email.
- This makes sure that your test lead(s) are treated as new.
Important: Reusing old test leads may prevent them from appearing correctly in Sierra.
Step 3: Preview Your Lead Ad Form
- Click Preview Form
- Select the Facebook Lead Ad form you want to test
Step 4: Enter Completely New Test Lead Information
When filling out the form, enter brand-new, fake information that has never been used before.
Use unique details for:
- Name
- Email address
- Phone number
Example:
- Name: Jon Snow
- Email: aegon@ironthrone.com
- Phone: (111) 111-1111
Using unique data ensures Sierra treats this as a new lead.
Step 5: Submit the Test Lead
-
Submit the form once all test information is entered.
-
This sends the test lead from Facebook into Sierra.
Step 6: Configure Your Lead Routing Rule in Sierra
Now that the test lead exists:
- Login to the Client Admin Area (CAA) in Sierra
- Click the Leads tab in the main header
- Go to Lead Routing in Sierra
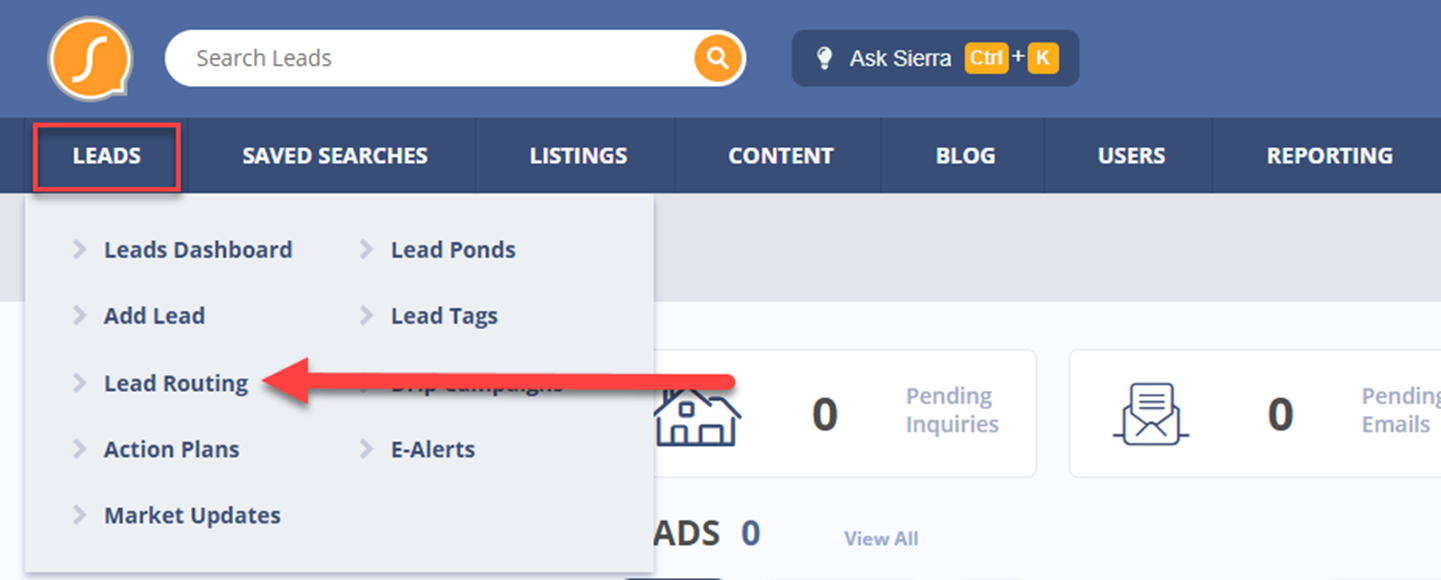
- Under Lead Criteria, select the Source Field
- Set the Source to Source Form Name
- Select the newly detected Facebook Lead Ad form
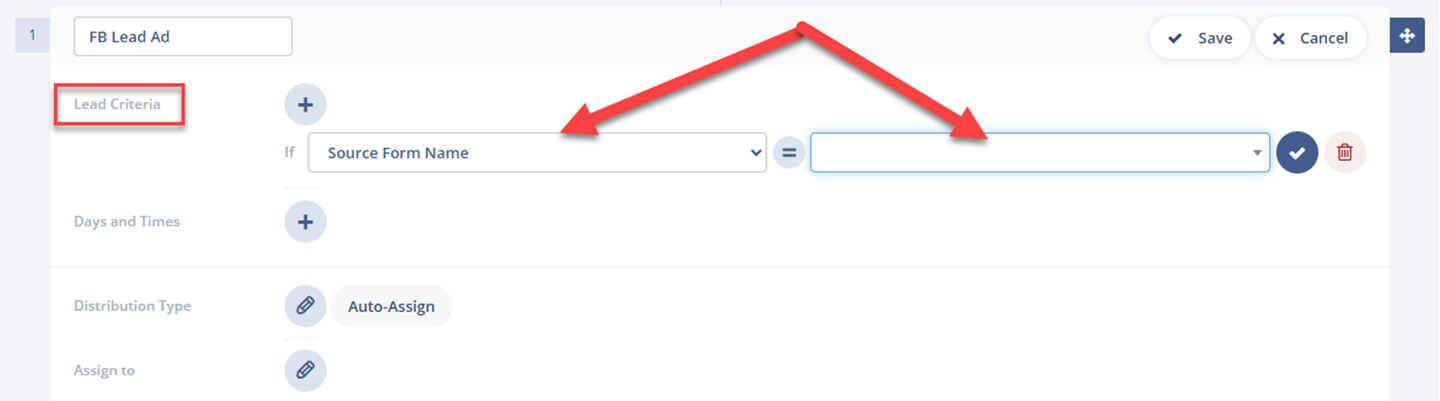
- Configure your routing logic (assignment, tags, actions)
- Save your rule
Your Facebook Lead Ad is now connected and routable.
What Happens Next
Once connected:
- Real Facebook Lead Ad submissions will flow into Sierra
- Leads will follow the routing logic you’ve configured
- No additional setup is required unless you change forms
Best Practices
-
Always test with brand-new fake contact info
-
Delete old test leads before re-testing
-
Test each Facebook form individually
-
Confirm routing rules before running live ads
-
Re-test if you duplicate or replace a form
Troubleshooting and Common Questions
Troubleshooting Common Issues
-
I don’t see the Facebook Lead Ad in Lead Routing Rules
Make sure you submitted a brand-new test lead using unique information. -
The test lead didn’t appear in Sierra
Confirm you used the correct Facebook account and form. -
My routing rule isn’t triggering
Double-check the Source and selected form in the rule.
FAQs
-
Will test leads affect my real data?
No. Test leads are clearly marked and used only for setup. -
Do I need to do this more than once?
Only when creating new Lead Ad forms or changing routing logic. - Can I route different forms differently?
Yes. Each form can have its own routing rule.