Overview
Not every lead comes through your website or integrated marketing tools. Open houses, referrals, events, and third-party platforms often require you to add leads manually so they can be tracked, routed, and followed up on inside Sierra.
Table of Contents
Why This Feature Matters
Manually adding leads helps you:
-
Capture opportunities from offline interactions or non-integrated sources
-
Ensure every lead is tracked in one centralized system
-
Assign or route leads quickly so no one falls through the cracks
-
Maintain a clean, accurate CRM by managing or removing incorrect records
How to Add a Lead
1. Navigate to the Add Lead Page
From the top menu, go to Leads > Add Lead.
2. Enter Required Information
Fill in the following required fields:
-
First Name
-
Last Name
-
Email Address (must be unique, even if it’s not a real email)
-
Password (used for the lead’s login to your Sierra website)
-
Lead Type (Buyer, Seller, or Both)
-
Lead Status (e.g., New, Qualify, Active)
-
Lead Source (e.g., Open House, Referral, Facebook)
3. Add Optional Information
You may also add:
-
Phone number(s)
-
Address details
-
Tags
-
Short summary
-
Notes
This information can help with future segmentation, automation, and follow-up.
4. Assign or Distribute the Lead
If you are a Primary Manager or Manager-level User, you can:
-
Assign the lead to a specific agent
-
Assign the lead to a pond
-
Select Place Lead into Distribution to trigger your routing rules
5. Save the Lead
Choose one of the following:
-
Submit and Close to finish
-
Submit and Add Another to continue adding more leads
Deleting a Lead (Primary Managers Only)
⚠️ Important: Deleting a lead is permanent and cannot be undone. Use this action with caution.
How to Delete a Lead
Thinking about deleting a lead? Before you do, check whether they’ve recently been active on your website or are still receiving and engaging with your marketing. Active, engaged leads still provide value and may be better suited for nurturing than deletion.
First, navigate to the lead using one of the following methods:
Option 1: Use the Leads Dashboard
-
Click the + button next to the lead's name
- Select "Permanently Delete Lead"
Option 2: Use the Leads Dashboard + Lead Detail Page
-
Go to Leads from the top navigation.
-
Open the Leads Dashboard.
-
Locate and click on the lead you want to delete.
Option 3: Use the Global Search + Lead Detail Page
-
Use the Search bar at the top of the page.
-
Type in the lead’s name (or email or phone number).
-
Select the lead from the results to open the Lead Detail Page.
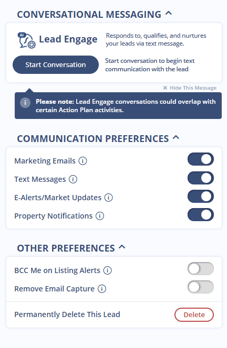
Once you are on the Lead Detail Page:
-
Scroll to the bottom of the page.
-
On the left side, under Other Preferences, click Permanently Delete This Lead.
Once deleted, the lead and all associated data are permanently removed and cannot be recovered.
Best Practices
-
-
Use a consistent naming convention for test or dummy emails (for example:
test_lead001@example.com) -
Add tags to make future filtering and automation easier
-
Check for existing records before adding a new lead to avoid duplicates
-
Use deletion sparingly — consider updating or archiving instead when appropriate by updating the lead status
-
Troubleshooting Common Issues
-
Issue: Error when submitting lead
Fix: Make sure the email address is unique and all required fields are completed -
Issue: Lead not routed properly
Fix: Double-check your lead routing rules or confirm that “Place Lead into Distribution” was selected
FAQs
-
Can Agent-level Users manually add leads?
Yes, all user roles (Primary Manager, Manager, Agent) can manually add leads. -
What happens if I use a fake email address?
It must still be unique. The lead will be created, but email features (e.g., auto-responders) may not function as expected. -
Can I manually route a lead after adding it?
Yes. You can assign leads directly or place them into distribution during the manual entry process.