
Summary
This guide provides essential instructions for managers to activate the Sierra Dialer, configure role and personal numbers, enable key settings for agents, and monitor usage to avoid overages. Following these steps ensures smooth agent onboarding, reliable communication, and cost control.
Table of Contents
Step 1: Enable the Dialer (Global Level)
Before agents can connect their phones, a manager-level user must enable voice and text integration globally.
- Click Gear icon → Dialer Settings → Enable Voice & Text Integration.
- Select your initial Buyer’s Agent Role Number (required for activation).
- Enter your personal cell number and verify using the 6-digit code.
- Enter Dialer Business Information (EIN or CBN required).
Optional:
- Repeat for your Listing Agent number and Lender number.
- Search for numbers by Country, Area Code, ZIP/Postal Code, City, Map, or Number Starts With.
- Add a “Catch-All” number to route calls/texts not assigned to a specific user.
Step 2: Understand Role vs. Personal Numbers
|
Type |
Purpose |
Notes |
|
Role Number |
Assigned to a lead role (Buyer’s Agent, Listing Agent, Lender) |
Calls/texts route to the assigned user |
|
Personal Number |
Assigned to an individual user |
Routes to that user regardless of lead assignment |
Additional Info:
- At least one Buyer’s Agent Role Number is required for Dialer activation.
- Even if you plan to port your number into Sierra, you must set up a temporary Buyer's Agent Role number that can be removed once porting is complete.
- At least one Listing Agent Role Number is required to use Seller Action Plans, or you need a Personal Dialer Number assigned to the Agent.
- Included numbers: first role number per role + one personal number per user.
- Additional numbers cost $2/month each.
Step 3: Configure Key Dialer Settings
Call Recording
Purpose: Ensure calls are recorded per company policy and state law.
Steps:
-
Click on the Gear Icon → Go to Dialer Settings → Call Recording.
-
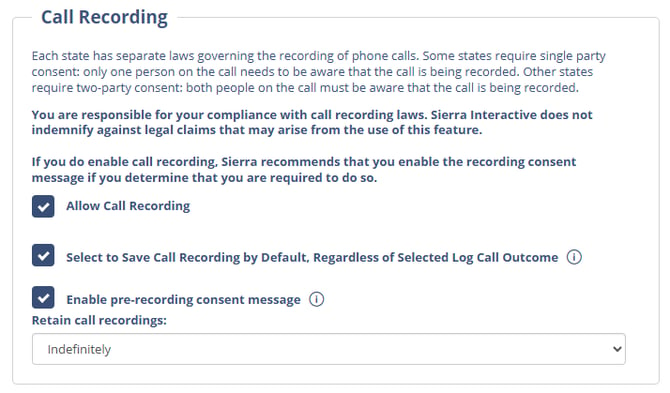
Toggle Allow Call Recording to enable for the account.
-
Choose default save behavior:
-
Save Recording by Default Enabled: All calls automatically save.
-
Save Recording by Default Disabled: Users can manually save calls.
-
-
Enable Pre-Recording Consent Message if required by state law (single vs. two-party consent).
-
Set Retention Period for recordings (options: 1 week → indefinite).
Notes:
-
Check your state laws before enabling recordings.
- Retaining call recordings can lead to overages and increase your monthly invoice. As detailed in Understanding your Dialer Billing.
-
Export important recordings before retention expires.
Caller ID
Purpose: Control how inbound and outbound calls display numbers.
Steps:
-
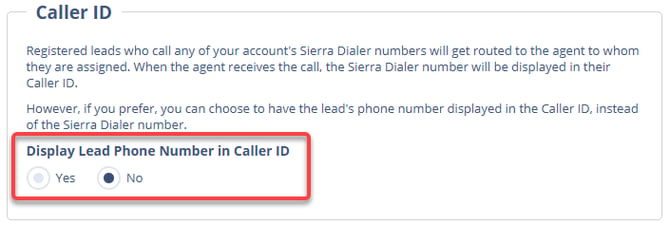
Click on the Gear Icon → Go to Dialer Settings → Caller ID.
-
Choose whether inbound calls show:
-
The Sierra Dialer number, or
-
The lead’s phone number.
-
Optional – Branded Caller ID (CNAM):
-
Only the Primary Manager can enable.
-
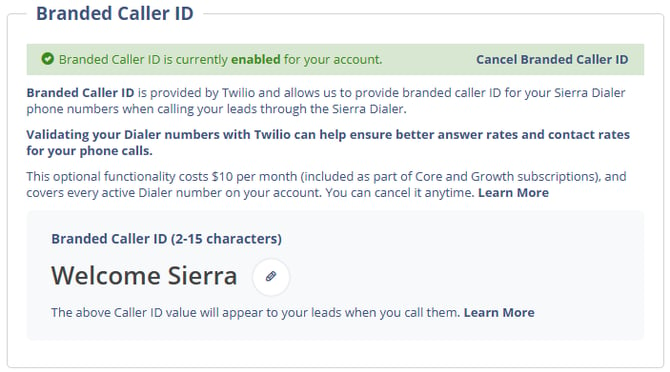
Go to Dialer Settings → Enable Branded Caller ID.
-
Enter a caller name (max 15 characters: letters, numbers, commas, periods, spaces).
-
Sierra submits to Twilio; updates take 7–10 days.
-
Cost: $10/month for all active numbers.
Press 1 to Claim
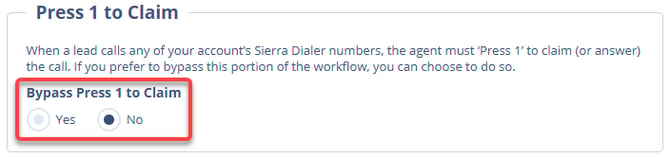
Purpose: Optional workflow requiring agents to press 1 to accept routed calls.
Steps:
-
Click on the Gear Icon → Enable the Press 1 to Claim toggle in Dialer Settings if your team wants this workflow.
Notes:
-
Helps manage call routing and ensures calls are answered intentionally. Does affect how fast leads are claimed while using Instant Call Lead Routing Rules. Claiming leads is no longer bound to pressing one first after answering the call, but instead answering the call first.
Agent Access & Permissions
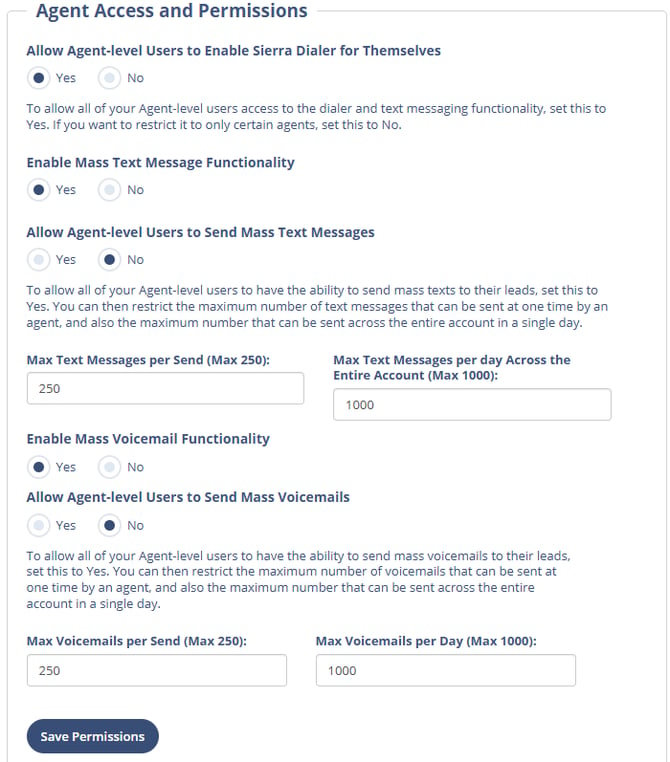
Purpose: Control which agents can use the Dialer and text messaging.
Steps:
-
Click on the Gear Icon →Go to Dialer Settings → Agent Access & Permissions.
-
Choose:
- Allow agents to enable the Dialer for themselves, allowing them to self-onboard.
- Mass Text and Voicemail must be enabled for Manager and Primary Manger Access to functionality.
- Also allows agents to access the Mass Text Messages, and Mass Voicemail Drops.
Mass Texting & Voicemail
Purpose: Set limits for large-scale communications.
Steps:
-
Configure Mass Texting limits:
-
Default Per Account: 250 texts per send, 1,000/day, 2,500/month.
-
Overages: $15 per 1,000 messages. Please see Understanding Your Dialer Billing Details for more information on Text Allotments.
-
-
To enable Group Text Messaging for your dialer, you must be on the Growth Plan and set-up Personal Numbers for each user.
Notes:
-
Monitor usage to avoid throttling or overage charges.
-
Combine with best practices in Step 5 for efficiency.
Step 4: Next Steps for Agents
- Agents connect their phone under User Profile → Voice & Text tab. Please see Getting Started With your Sierra Dialer to learn how to connect at the User level.
- Verify their number to enable calls, texts, and voicemail drops.
Additional Info:
- Outbound communications display the assigned role number, not the personal number.
- Inbound calls/texts route to the agent assigned to the lead.
- Update voicemail greetings and templates for a professional experience.
- Voicemail Greeting is required if you are planning to use the Instant Call Feature in the Lead Routing Rules.
Step 5: Dialer Usage Limits and Managing Overages
Text Messaging
- Monthly Allotment: Each account has a set number of messages segments; additional usage incurs overage.
- Throughput Limits: Carriers limit how many messages can be sent per second. Large campaigns may take longer.
- Blocked Messages: Messages may fail if limits are exceeded until the next billing cycle or additional credits are applied.
Calling
- Minutes: Outbound and inbound calls are billed per minute; overages are charged per minute.
- International Calls: Not included by default; may be billed separately.
- Call Duration: Extremely long calls may disconnect automatically.
Voicemail & Call Recording Storage
- Default Retention: Recordings are stored for 90 days.
- Extended Storage: Longer retention available for an extra fee.
- Overages: Exceeding storage may prevent new recordings from saving.
Viewing Usage vs. Billing Source of Truth
-
The usage shown on the CAA Dialer page (Gear Icon → Dialer Billing Detail) is an estimate based on call and text activity during that time window.
-
Dialer usage is billed in arrears and reconciled with our third-party carrier (Twilio), so the CAA usage window may not perfectly align with your invoice period.
-
Your invoice in the Billing Portal reflects the finalized, reconciled usage totals and is the source of truth for billing.
Best Practices to Avoid Overages
- Monitor usage regularly in the Dialer Dashboard.
- Use personal Dialer numbers to distribute text volume and avoid carrier throttling.
- Review automations to prevent unnecessary high-volume messages.
- Set internal guidelines for voicemail drops and mass texting.
- Export important recordings before retention limits expire.
Best Practices for Managers
- Train managers on role vs. personal numbers before agent onboarding.
- Double-check all Dialer Settings before granting agent access.
- Keep documentation of included and additional numbers for billing awareness.
- Regularly review Dialer usage, call recordings, and compliance settings.
FAQs
- Can I activate the Dialer without a Buyer’s Agent Role Number?
No, at least one Buyer’s Agent Role Number is required. - Can agents enable the Dialer themselves?
Yes, if you allow agent-level users to enable it in Dialer Settings. - What’s the difference between a Role Number and a Personal Number?
Role Numbers route based on lead assignments; personal numbers route to the individual user. - Are additional Dialer numbers free?
No, the first role number per role and one personal number per user are included; additional numbers are $2/month each. - How do mass texting limits work?
Default Max Settings: 250 texts per send, 1,000 per day, 2,500 per month; overage = $15 per 1,000 extra messages. - How are overages billed?
Overages appear as line items on your monthly invoice, based on per-message or per-minute rates. - Can I get alerts before hitting my limits?
Yes, admins can opt in for account usage notifications. - Can I disable overages?
No, you will however receive alerts as your pass through thresholds notifying you of dialer usage amount remaining.