This guide walks you through how to create and publish a content page in Sierra, from entering basic page details to configuring settings, adding content, and saving your work. It also covers common editing tasks such as formatting text, inserting images, adding links, and building landing or squeeze pages.
Table of Contents
Creating a New Content Page
Content pages are used for neighborhoods, communities, buyer and seller pages, landing pages, and more. Here is how to create one from scratch.
Step 1: Navigate to Content Pages
- Log in to the Sierra Client Admin Area (CAA).
- Click Content in the top navigation.
- Select Content Pages.
- Click the Create New Page button. This opens the Add Content Page form.
Step 2: Enter a Page Title, Filename, and Section
- Enter a Page Title. Keep it short and clear. This appears in your site navigation. Avoid stuffing keywords here.
- Press the Tab key after entering your title. The Page Filename is auto-generated from your title and becomes the page URL. In most cases, leave it as is.
- Choose the appropriate Section from the dropdown. Sections control your navigation menus and determine where the page lives on your site.
|
Example: Page Title: Highland Park Homes Page Filename: /highland-park-homes/ |
Step 3: Configure Page Status and Page Type
- Page Status: Toggle ON to make the page visible in site navigation, or toggle OFF to mark the page as On Hold while you’re still building out the content. When the page is ready to go live, change the status to Active and save again.

- Page Type: Choose the appropriate page type
- General: Default, no Listings or Agent/Team widgets.
- Listings/Community: When one or more Active Listings Widgets are added.
- Agents/Team: When one or more Agent/Team Members widgets are added.
- Note: Pages can contain either Listings Widgets or Agent/Team Widgets, not both, to maintain fast loading.
Step 4: Add Default Page Photo and Page Overview
- Default Page Photo: This image will be used as the thumbnail when sharing this content page via a link.
- Page Overview: Only appears in the Content Label when the option “Display with Image and Description” is selected. To learn more about using Content Labels, see: Organize and Display Related Content with Content Labels

Step 5: Draft in the Content Area
The editor has two main areas: a menu bar across the top and an icon row just below it.
The Menu Bar
The menu bar contains seven menus: File, Edit, View, Insert, Format, Tools, and Table. Most day-to-day tasks can be handled from the icon row without opening a menu, but the menus are where you will find advanced options.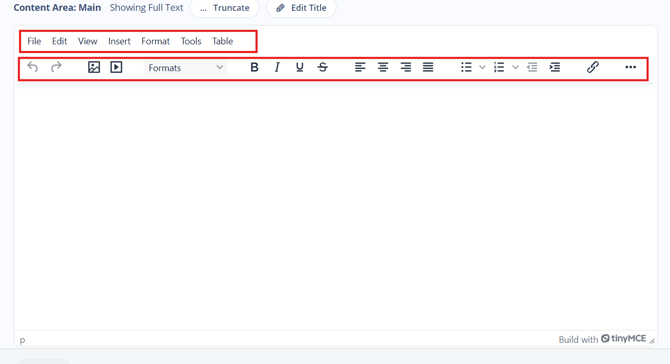
The Icon Row
The icon row gives you one-click access to the most common actions:
- Undo / Redo arrows on the far left to step backward or forward through your changes
- Image icon to insert an image into your content
- Video icon to embed a video
- Formats dropdown to apply heading levels (Heading 1, Heading 2, Heading 3) or return text to the default paragraph style
- B / I / U / S for Bold, Italic, Underline, and Strikethrough
- Alignment icons to align text left, center, right, or justify
- List icons for bulleted lists and numbered lists, each with a dropdown for list style options
- Indent icons to increase or decrease indentation
- Link icon to add or edit a hyperlink
- ... (More) on the far right to access additional options that do not fit in the visible row
The Formats dropdown is where you apply heading styles. Using Heading 1, Heading 2, and Heading 3 throughout your content helps search engines understand the structure of your page, which supports better SEO performance.
Step 6: Add Page Components (Optional)
A page component is a prebuilt on-page element for your website that allows you to enhance your content pages without frontend web development experience.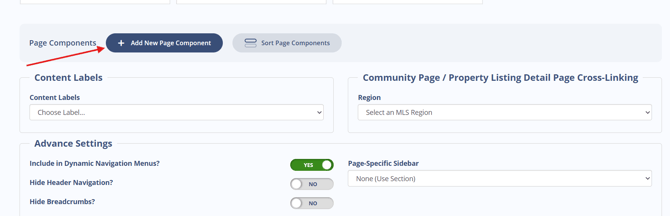
Step 7: Add Content Labels (Optional)
Content Labels are an optional feature for content pages. They help you organize and surface related links throughout your site. To get started, visit: Organize and Display Related Content with Content Labels
Step 8: Configure Advance Settings
If you are unfamiliar with these settings or unsure how they impact your pages, you can leave these as the defaults. If you are looking to customize even further, follow the table below.
|
Setting |
Description |
Notes |
|
Include in Dynamic Navigation Menus? |
Determines whether the page appears in the submenu for its section. |
Works when Submenu Type – Pages in Section is enabled in Section Manager. |
|
Hide Header Navigation? |
Controls whether the main site navigation is visible. |
Useful for landing pages or campaigns. |
|
Hide Breadcrumbs? |
Controls whether breadcrumb navigation is shown at the top of the page. |
Example: Home → Section → Page |
|
Hide Footer Navigation? |
Controls whether footer navigation elements are visible. |
Footer typically contains site-wide links. |
|
Display Sidebar on This Page? |
Determines whether the sidebar is visible. |
Sidebars can include links, forms, widgets, calls to action. |
|
Full / Fluid Width Page? |
Controls whether the page spans the full browser width. |
Useful for visual layouts or rich content pages. |
|
Page-Specific Sidebar |
Select which sidebar appears on the page, or choose none. |
Sidebars are created and managed via Sidebar Manager. |
|
Robots / Page Indexing |
Controls whether search engines crawl and index the page. |
Use to hide draft/internal pages or allow public pages to appear in search results. |
Step 9: Complete Meta Settings
Meta tags help search engines understand your page. They do not need to be complicated, but they do matter.
- Meta Title: 60 to 70 characters. Focus on one or two primary phrases. Use a pipe symbol ( | ) to separate phrases if needed.
- Meta Description: 150 to 200 characters. Write one or two clear sentences for a human reader, not for an algorithm.
- Meta Keywords: Optional. If used, keep it to one or two lowercase phrases, separated by commas.
- Robots Page Indexing: Controls whether search engines crawl and index the page.
- Leave set to “index, follow” unless you have a specific reason to exclude the page from search engines.
Step 10: Save the Page
- Click Save to create the page and content will be live on your website
- Preview lets you see how the page or post will look on your website before it is published.
- If you do not want the page to publish yet, change the Page Status to On Hold.
Common Editing Tasks
Applying a Heading Style
Use Heading 1 only once per page, at the top. Use Heading 2 and Heading 3 for sub-sections. Do not use font size or color tools to style headings.
- Click into the line of text you want to change.
- Open the Formats dropdown in the icon row.
- Select Heading 1, Heading 2, or Heading 3. The text updates immediately.
- To return text to normal body style, open Formats and select Paragraph.
Inserting an Image
To add Images visit: Adding Images in the Content Editor
Importing Docs
To import docs follow: Maintain Clean Formatting When Importing Docs Into Sierra
Adding a Hyperlink
- Highlight the text you want to turn into a link.
- Click the Link icon in the icon row.
- Paste or type the destination URL.
- For external sites, select Open in new window so visitors do not leave your site entirely.
- Press Enter or click the confirmation button to apply.
To remove a link, highlight the linked text and click the broken link icon in the icon row.
Creating a List
- Click in the content area where you want the list to begin.
- Click the Bulleted List or Numbered List icon. You can click the small dropdown arrow next to either icon to choose a list style.
- Type your first item and press Enter to add the next.
- Press Enter twice or click the list icon again to exit the list and return to normal text.
Inserting a Table
- Place your cursor where you want the table.
- Open the Table menu in the menu bar.
- Select Insert Table and choose your row and column count.
- Click inside any cell to start entering content.
Undoing a Mistake
Click the Undo arrow on the left side of the icon row, or press Ctrl + Z (Windows) or Cmd + Z (Mac). Use the Redo arrow or Ctrl/Cmd + Y to move forward again.
Creating Landing Pages and Squeeze Pages
You can convert any content page, community page, or blog post in Sierra into a landing page or squeeze page using the Tracking Link Generator. To get started, visit: Create Tracking Links to Capture More Leads & Promote Your Website Content with Tracking Links
FAQs
-
Is AI writing assistance available in the Content Editor?
AI writing assistance is planned for a future update. Sierra will communicate that release through the usual channels when it is available.
-
Do I need content pages for SEO to work?
Yes. Content pages give search engines and visitors something meaningful to engage with. Without them, your site has very little for Google to index beyond listing data.
-
Can content pages generate leads?
Yes. You can add a contact form to any content page, or convert it into a squeeze page using the Tracking Link Generator to require registration before viewing the content.
-
Can I hide a page from navigation?
Yes. Set Include in Navigation Menu to No when configuring the page in Advance Settings. Hidden pages are still accessible via direct link and can be useful for campaign-specific landing pages.
-
What if I run into a problem or something is not working correctly?
Contact Sierra Support through the Help Center or submit a ticket. Include a description of what you were trying to do, what happened instead, and a screenshot if possible.