
Connect SendGrid to Sierra Interactive to send listing alerts, drip campaigns, and action plans at scale from a verified domain.
Setup Overview
Complete these steps in order. Each links to the full instructions below.
|
Step |
What You're Doing |
Where |
|
Create your account, enable 2FA, add billing info |
SendGrid |
|
|
Verify your domain and complete Link Branding |
SendGrid |
|
|
Create a Full Access API key |
SendGrid |
|
|
Paste your API key and set your sending email |
Sierra |
|
|
Set marketing email and listing alert toggles |
Sierra |
|
|
Turn off two settings that break links |
SendGrid |
|
|
Monitor opens, clicks, and unsubscribes |
Sierra |
⚠️ Steps 1–6 must be completed before your integration is fully active. Step 7 is ongoing.
Also in this article: Prerequisites · Best Practices · Troubleshooting · FAQs
Why This Feature Matters
Without a connected email service, Sierra's mass email features (listing alerts, drip campaigns, and action plan) can't send at volume from a professional, verified domain. Connecting SendGrid gives you:
- Deliverability at scale: Send to your full lead database without hitting provider limits.
- Professional sender identity: Emails go out from your verified domain, not a generic address.
- Performance visibility: Track opens, clicks, and unsubscribes from Sierra's Mass Email Dashboard.
- Centralized control: One integration governs outbound mass email across your whole account, with flexibility for individual users on the same domain.
Prerequisites
Before starting setup, confirm the following:
- You are a Primary Manager or Manager-level user.
- Select a domain to authenticate with SendGrid. It requires DNS access and doesn't need to match your Sierra login. If Sierra hosts your domain via Cloudflare, contact Sierra Support for verification assistance.
- You have created a SendGrid account. You can sign up at signup.sendgrid.com.
- You have enabled Two-Factor Authentication (2FA) in your SendGrid account.
- You have added billing information in your SendGrid account. This is required before you can select a paid plan, which is necessary to complete setup.
- You have an email address using that domain (ex: info@yourbrokerage.com). This address must be authenticated with the domain before setup.
Step-by-Step Instructions
1. Create a SendGrid Account
- Navigate to signup.sendgrid.com to create your account. Note that Twilio branding may appear during sign-up; SendGrid is part of the Twilio platform.
- Enable Two-Factor Authentication (2FA) immediately to secure your account.
- Enter your payment details under Account Details > Billing.
A paid plan is necessary for high-volume sending. To upgrade:
- Click your profile name and select Account Details.
- Open the Your Products tab.
- Locate the Email API section and click Change Plan.
- Choose a plan based on your estimated monthly volume. If buttons are grayed out, ensure 2FA and billing setup are complete.
- Review and confirm your purchase.
For current rates, visit the SendGrid Pricing Page.
2. Authenticate Your Domain
Domain authentication is a critical security step that authorizes SendGrid to send emails on your behalf. This verification is required before you can connect your account to Sierra.
Scenario A: Sierra Hosts Your Domain via Cloudflare
- In SendGrid, go to Settings > Sender Authentication and click Authenticate Your Domain.
- Select Cloudflare as your provider and choose Yes for Link Branding. Click Next.
- Enter your domain (e.g., yourbrokerage.com) and click Next.
- Choose Send to a Coworker and enter support@sierrainteractive.com. This sends your DNS records to our team for installation.
- Sierra's Support team will install the DNS records and send you a confirmation email. That email will also include your EM#### and URL#### identifiers so keep these handy in case you need to identify which records were installed.
- Once you receive the confirmation, return to Settings > Sender Authentication. You should see your domain listed with a Pending status. Click the pending domain link.
- Click the Verify button in the top right corner. Verification is usually available as soon as you hear back from Sierra's team, though it can take up to 24 hours.
Scenario B: You Manage Your Own DNS
- In SendGrid, navigate to Settings > Sender Authentication and click Authenticate Your Domain.
- Follow SendGrid's guided setup. SendGrid will provide CNAME records to add at your domain registrar.
- Add the records in your registrar's DNS settings. DNS propagation can take up to 48 hours.
- Return to SendGrid and click Verify once records are in place.
⚠️ Important: You must also verify Link Branding. Failure to do so can result in poor deliverability and broken links.
- Scroll down on the Sender Authentication page to the Link Branding section.
- Click your domain in the Link Branding section, then click Verify in the top right corner.
3. Generate Your API Key
- In SendGrid, navigate to Settings > API Keys.
- Click Create API Key.
- Name the key something recognizable (ex: Sierra Interactive Integration)
- Under API Key Permissions, Full Access is selected by default. Leave this as-is. Sierra requires full access to send mail, manage unsubscribes, and track engagement. A restricted key will cause the integration to fail.
- Click Create & View, then click the key to copy it.
⚠️ Save your API key before closing the window and store it somewhere secure. SendGrid will not show this key again after you leave the page. If lost, you'll need to generate a new key and reconnect the integration in Sierra.
4. Connect SendGrid in Sierra
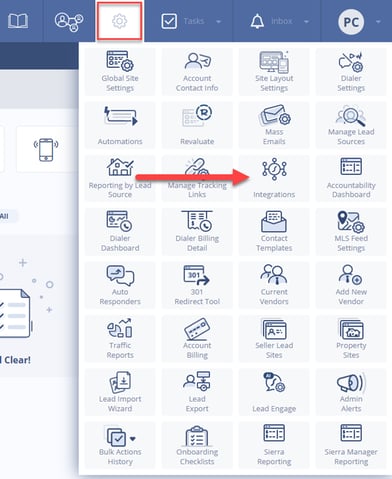
- In Sierra, click the gear icon and select Integrations.
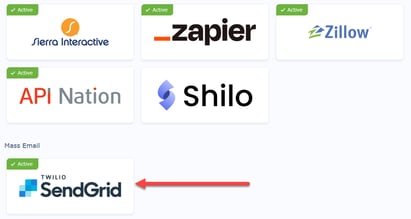
- Scroll down to find SendGrid and click it.
- Paste your API key into the field provided and click Validate API Key.
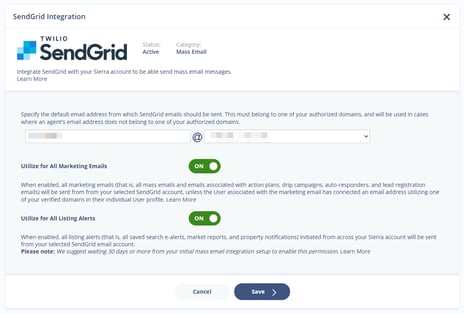
- Once validated, enter the prefix for your default sending email. For example, enter info if your sending address will be info@yourbrokerage.com. Sierra will use your verified domain as the suffix automatically.
5. Configure Your Sending Settings
After connecting your API key, you'll see two toggle settings. How you configure these depends on where you are in the setup process:
For the first 30 days after connecting:
- Turn On — Utilize for All Marketing Emails
- Turn Off — Utilize for All Listing Alerts
This allows your sending domain to warm up gradually. Sending high volumes of listing alerts immediately on a new domain can trigger spam filters.
After 30 days:
- Return to Gear icon > Integrations > SendGrid and turn On — Utilize for All Listing Alerts
Click Save to apply your settings.
⚠️ Listing alerts always use the account-level domain and handle. User-level email settings do not affect listing alert delivery. If an agent has connected a personal email using the same domain, their marketing emails will be sent from their address. If their email uses a different domain, all their mass emails will still route through the account-level SendGrid address.
6. Disable Click Tracking and Subscription Tracking
⚠️ This step is required. Two settings in your SendGrid account must remain disabled. Enabling either one can cause broken links in emails sent through Sierra.
- In SendGrid, navigate to Settings > Tracking.
- Confirm that Click Tracking is disabled.
- Confirm that Subscription Tracking is disabled.
Do not enable these settings at any point while using the Sierra SendGrid integration.
7. Review Email Performance
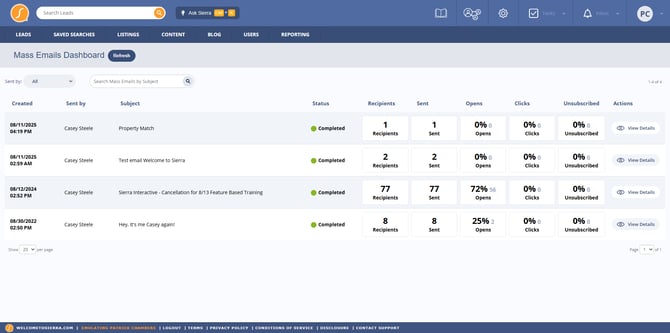
- In Sierra, navigate to the Gear icon > Mass Email Dashboard.
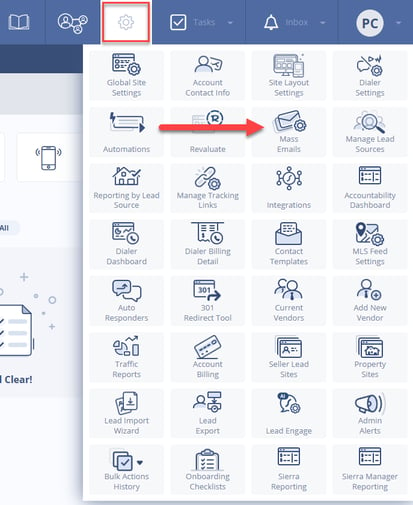
- From the dashboard, you can:
- View all sent mass emails across your account
- Filter by sender (individual agent or account-level)
- Track open rate, click rate, and unsubscribe rate
8. Edit or Disconnect the Integration
- Navigate to Gear icon > Integrations > SendGrid in Sierra.
- From this screen you can:
- Update your sending email prefix or domain
- Adjust the Utilize for All Marketing Emails and Utilize for All Listing Alerts toggle settings
- Disconnect the integration entirely
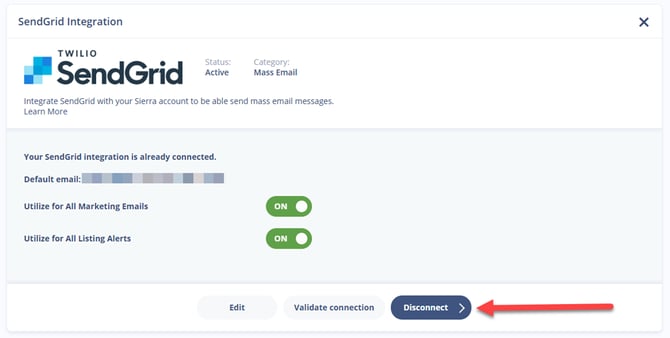
⚠️ Disconnecting SendGrid will immediately stop all mass email delivery, including active drip campaigns, action plans, and listing alerts. Leads currently enrolled in campaigns will not receive pending emails until a new integration is connected and validated. Reconnecting with a valid API key and verified domain will resume delivery.
Best Practices
- Warm up your sending domain gradually. If your domain is new to high-volume sending, start with smaller batches and scale up over days or weeks. Sudden volume spikes can trigger spam filters even on verified domains.
- Use a role-based handle that reflects your brand. Addresses like listings@yourbrokerage.com or team@yourbrokerage.com perform better than generic handles and reinforce your identity with leads.
- Monitor your unsubscribe rate closely in the first 30 days. A rate above 0.5% is a signal to review list quality or email frequency — not just content.
- Confirm domain verification is complete before activating campaigns. Running campaigns from an unverified domain can damage your sender reputation in ways that are difficult to reverse.
- Brief your agents on the sending rules before launch. Agents with individually connected emails on the same domain will send from their own address — make sure they know this and that their address looks professional.
Troubleshooting Common Issues
- Issue: Sending domain not appearing in the Sierra dropdown
Solution: The domain has not completed verification in SendGrid. Return to Settings > Sender Authentication in SendGrid and confirm all DNS records show as verified. If your domain is hosted by Sierra via Cloudflare, contact support@sierrainteractive.com. - Issue: API key validation fails in Sierra
Solution: Confirm the key was created with Full Access permissions in SendGrid. Restricted or read-only keys will not validate. Generate a new Full Access key if needed and re-enter it in the Integrations Manager. - Issue: Emails are landing in spam
Solution: Verify that domain authentication (DKIM and SPF records) is fully complete in SendGrid. If records were recently added, allow up to 48 hours for DNS propagation before testing again.
FAQs
- Does the domain I authenticate with SendGrid have to match my Sierra site domain?
No. You can authenticate any domain you own with SendGrid; it doesn't have to be the same one you use for your Sierra site or login. Just make sure the email address you plan to send from is using that same domain. - I see Twilio branding when I log into SendGrid, is that correct?
Yes. SendGrid has merged with Twilio and is now operating under the Twilio platform. Your SendGrid account, email products, and settings all work the same way the branding has just changed. - Will my existing action plans and drip campaigns automatically use the new sending domain?
Yes. Once the integration is active and your domain is verified, all mass email types (action plans, drip campaigns, and listing alerts) will route through the configured SendGrid domain and handle. - Can individual agents send from their own email address through this integration? Yes, if the agent has connected a personal email address in Sierra that uses the same domain as the SendGrid integration. If their connected email uses a different domain, their mass emails will still send from the account-level address.
- What happens to campaigns if I disconnect SendGrid?
All mass email delivery stops immediately, including active drip campaigns, action plans, and listing alerts. Leads currently enrolled in campaigns will not receive pending emails until a new integration is connected and validated.