Table of Contents
Before You Begin
Depending on which auto-responder types you want to use, confirm the following prerequisites are in place:
| Requirement | Needed For | Setup Guide |
|---|---|---|
| Sierra Dialer enabled at the account level | Text auto-responders | Mastering the Sierra Dialer |
| Sierra Dialer connected at the user level | Text auto-responders | Getting Started with Your Sierra Dialer (Agent Guide) |
| Email account connected in your user profile | Email auto-responders | Connect Your Email to Sierra |
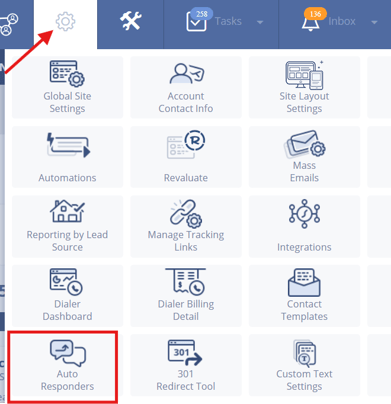
Access Auto-Responders
- Click the gear icon in the upper-right corner of your Sierra CRM.
- Select Auto Responders.
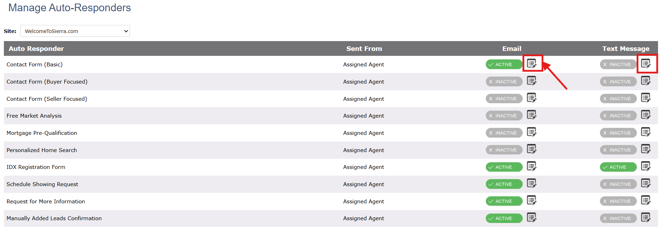
Edit an Auto-Responder
From the Auto Responders dashboard:
- Locate the auto-responder you want to change.
- Click Edit.
- Update the email content, text message content, or both.
- Fill in your message content.
- For text messages: You can configure up to two messages per auto-responder.
- Message 1 — sent immediately or can be delayed
- Message 2 — optional; can be delayed 1–20 minutes after Message 1

- For text messages: You can configure up to two messages per auto-responder.
- Fill in your message content.
- Save your changes.
💡When drafting your messages, use merge fields to save time and personalize your messages.
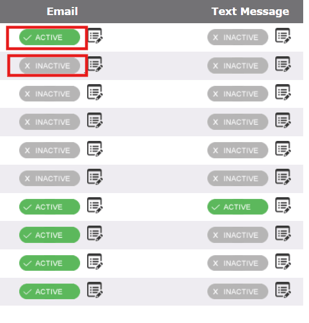
Activate or Deactivate an Auto-Responder
From the Auto Responders dashboard:
- Locate the auto-responder you want to update.
- Toggle its status to Active or Inactive.
⚠️ An auto-responder will not send unless it is marked Active and either selected in your Lead Routing Rules or triggered by a listing page form
Connect Auto-Responders to Lead Routing
Auto-responders work in two ways depending on where the lead comes from.
Standard leads (via Lead Routing Rules)
For most lead sources, auto-responders are triggered through your Lead Routing Rules:
- Open the Lead Routing Rule you want to update.
- In the auto-responder setting, select Use Corresponding Auto-Responder (When Active).
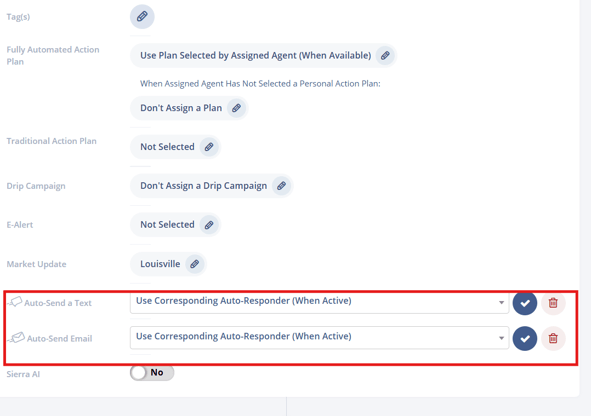
- Save the rule.
Listing Detail Page forms (automatic)
If a lead submits a Request More Info or Schedule a Showing form on a listing detail page, the corresponding auto-responder fires automatically no Lead Routing Rule configuration needed as long as the auto-responder is active.
Best Practices
- Keep text messages short and action-oriented. Leads are more likely to respond to a clear next step.
- Use a warm, conversational tone in email auto-responders; avoid sounding templated.
- Test different delays for Message 2 (try 5, 10, and 15 minutes) to find what improves engagement for your audience.
- Review and refresh your auto-responder copy periodically.
- Confirm your auto-responders are active before launching a new lead source or campaign.
Troubleshooting Common Issues
- Auto-responder not sending Confirm the auto-responder is set to Active. If it's tied to a lead routing rule, verify the rule is configured to use it. See Configuring Lead Routing Rules.
- Text message not delivered Confirm the Sierra Dialer is enabled at the account level and that the sending user has connected their profile to the Dialer.
- Email auto-responder not sending Confirm the sending user has connected their email account in their Sierra profile. See Connect Your Email to Sierra.
FAQs
-
Can I send both an email and a text auto-responder for the same lead?
Yes. As long as both are created, active, and selected in your Lead Routing Rules (or triggered by a listing page form), both will send. -
How many text messages can I include in one auto-responder?
Up to two. Message 1 sends immediately; Message 2 is optional and can be delayed 1–20 minutes. -
Do I need to configure Lead Routing Rules for listing page auto-responders?
No. Auto-responders tied to Request More Info and Schedule a Showing forms fire automatically when active — no routing rule required. - How do I turn off auto-responders?
You will need to toggle the auto-responder to "inactive."