Overview
Market Updates automatically send area-based market activity to seller and homeowner leads. When set up correctly, they keep your brand in front of sellers, create natural follow-up opportunities, and help clients make informed decisions when they're ready to list.
Market Updates are built from Saved Searches. You cannot create a Market Update without first creating a saved search as the search defines which listings your lead will receive.
Table of Contents
Before You Start
You can create a saved search in two places.
Option 1: From the Saved Searches Tab
- Navigate to the Saved Searches tab at the top of Sierra.
- Create a new search and apply listing criteria.
Option 2: From Inside a Lead Profile (Most Common)
- Open the Lead Detail page from the Leads Dashboard or by searching at the top of Sierra.
- Navigate to the Searches tab.
- Click Create Market Update.
- Build your search criteria and save.
Saved Search Names Are Visible to Leads
The name you give a saved search appears in the lead's alert emails. Always use clear, descriptive names that include location, property type, or other identifying details.
- ✅ "Eastside Neighborhood — Single Family Homes"
- ❌ "Seller Search 1"
How to Set Up a Market Update
Step 1: Open the Lead
- Navigate to the seller or homeowner lead.
- Select the Searches tab.
Step 2: Create the Market Update Search
Click Create Market Update and configure search filters such as:
- Neighborhood or subdivision
- Zip code
- Property type
- Comparable price range (optional but recommended)
Save the search.
Step 3: Select Update Frequency
Choose a cadence based on where the lead is in their journey:
- Monthly — Most seller leads
- Quarterly — Past clients or long-term homeowners
- Weekly — Sellers preparing to list or monitoring an active market
Step 4: Include Exact Match Only (Optional)
Check Include Exact Match Only to filter out partial matches from the Market Update email. This keeps the content tightly relevant to the lead's area.
Step 5: Save and Activate
Once saved, Sierra automatically sends market updates to the lead at the selected frequency.
What the Lead Receives
Leads receive an automated email that includes:
- The name of the update
- A button linking to the live market update page
- Basic stats on active, pending, and sold listings
- Your user signature
Note: Email content is not customizable.
When a lead clicks through, they're directed to a dedicated web page showing:
- Tabs for Active, Pending, and Sold listings
- Property photos, addresses, and key details
- Average listing values per status
- A call-to-action to check their home value (links to your Seller Lead Landing Page, or Free Market Analysis form if not enabled)
Optional: Receive Copies of Market Update Emails (BCC)
You can receive copies of the emails sent to your leads.
- Open the lead profile.
- Go to the Summary section.
- Scroll to the bottom of the left-hand side to Other Preferences.
- Enable BCC Me on Listing Alerts.
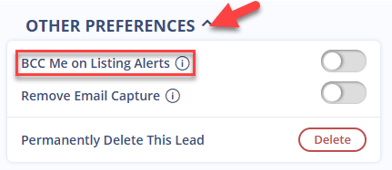
When enabled, the assigned agent receives a copy of each Market Update email sent.
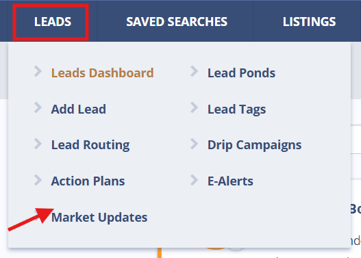
Monitoring Market Updates
Review alert activity from the Leads Dashboard.
- Navigate to Leads
- Select Market Updates.
From this dashboard you can:
- View when updates were started
- See alert frequency
- Check last sent and last opened dates
- Track last clicked activity
- Delete alerts if needed
💡Alerts must be created or edited from saved searches or the lead profile. The dashboard is for review and management only.
Best Practices
- Set up Market Updates for seller leads as soon as they enter your system. Even lower-engagement leads benefit from continued brand visibility.
- Match frequency to lead readiness. Monthly works for most sellers; weekly is appropriate for anyone preparing to list soon.
- Review alerts every 60–90 days. Market conditions and seller timelines change so periodic reviews keep criteria accurate.
- Use opens and clicks as follow-up signals. Engagement activity often indicates a seller is actively thinking about the market and creates a natural conversation starter.
Troubleshooting Common Issues
-
No sold listings appear.
Confirm your MLS feed and Sierra account include sold data. -
Update emails are not arriving on the expected schedule.
Emails are auto-sent based on the creation date and frequency, between 8–10 AM in your local time zone. The day is determined by when the update was created, not a manually set schedule.
FAQs
-
How often is market update data refreshed?
In real time, every time your MLS feed updates. The link always shows the latest available data. -
Can I pick the exact day or time updates send?
No. Delivery is automated and begins the day after setup, based on the selected frequency. -
Can leads edit their own update criteria?
No. All changes must be made by agents within Sierra. -
Can I see what emails my leads receive?
Yes. Enable BCC Me on Listing Alerts in the lead profile, or navigate to the Lead Detail Page > Searches > click the arrow icon under Actions to preview search results. -
Do Market Updates stop automatically if a lead goes inactive?
No. They continue based on your settings until you change them. This keeps your brand in front of leads even during quiet periods.