
Table of Contents
- Why This Feature Matters
- Step-by-Step Instructions
- Applies Account-Wide
- Best Practices
- Troubleshooting Common Issues
- FAQs
Why This Feature Matters
Auto-tagging helps you spot and prioritize high-intent leads without relying on someone to catch every notification. When a lead saves a listing, returns to your site, or views the same property multiple times, Sierra can apply a tag automatically, no manual review required.
This gives your team a few concrete advantages:
- Faster speed-to-lead, since active or returning leads get flagged the moment they take action
- Smart filters built on auto-applied tags, so high-value leads surface on the Manage Leads page without a manual search
- Fewer missed follow-ups caused by a notification getting buried or overlooked
- A more sustainable workflow for ISAs and agents managing a high volume of leads
Step-by-Step Instructions
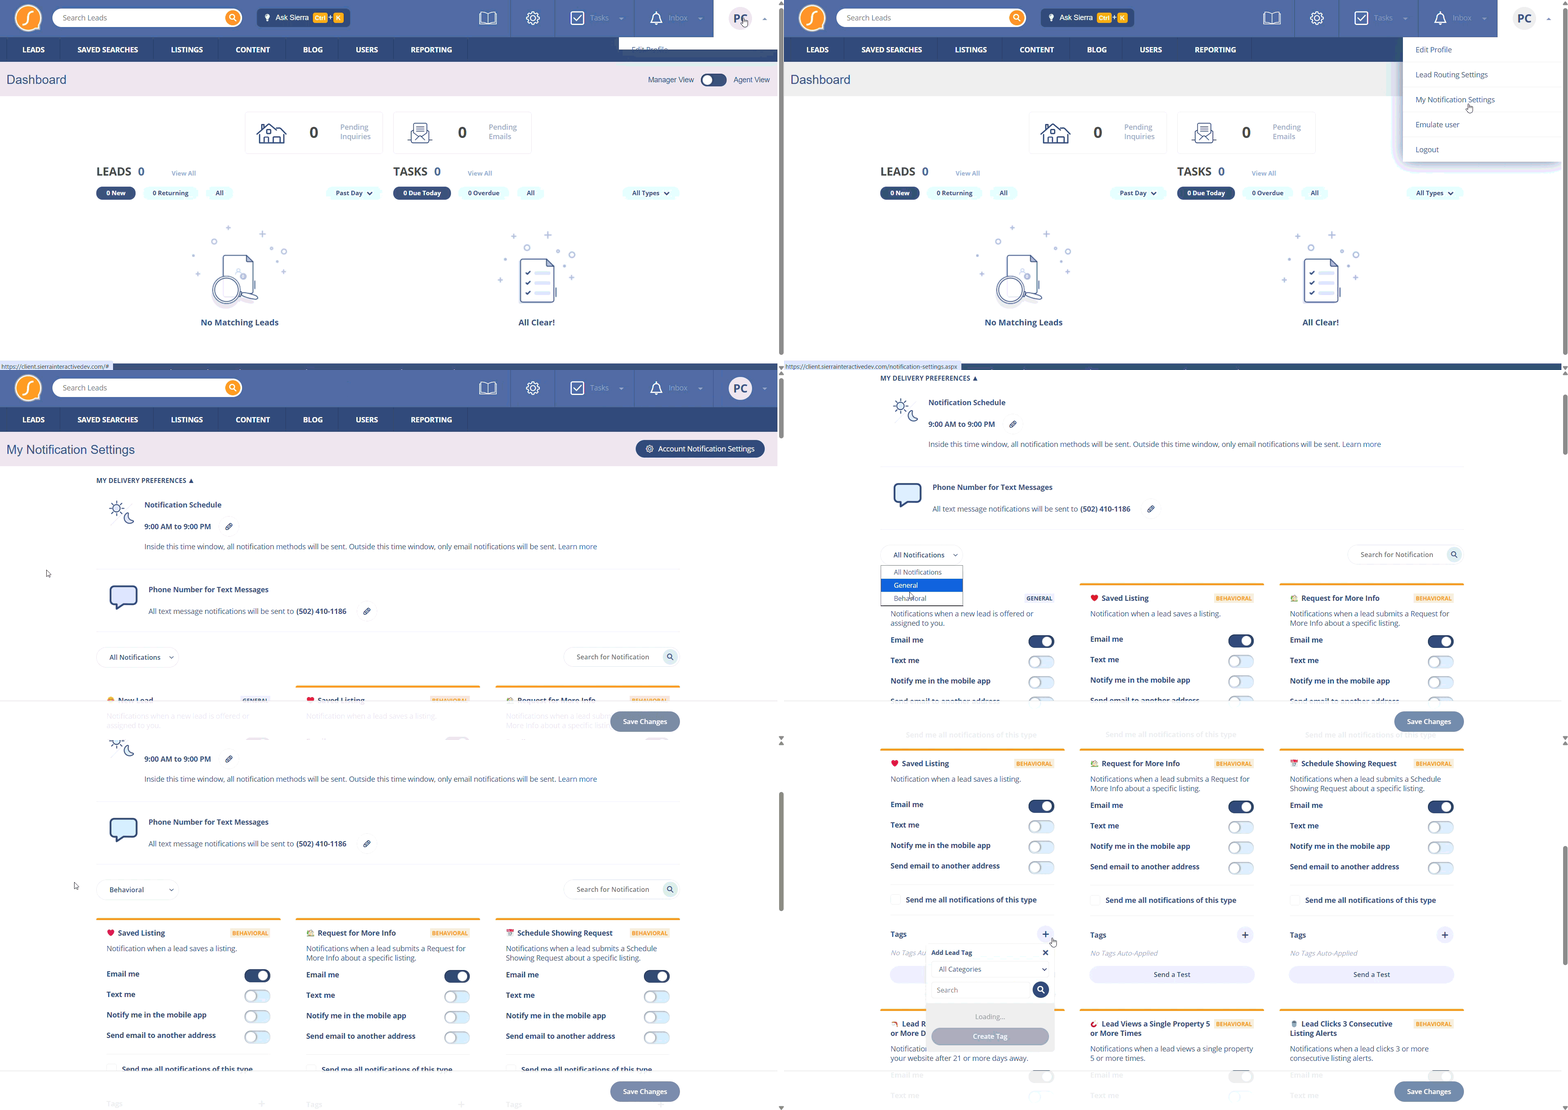
Enable auto-tagging based on behavior
- Click on your profile icon on the top-right corner.
- Select My Notification Settings.
- On the dropdown select Behavioral.
- Locate the notification type you want to tag (for example, Saved Listing or Viewed Property X Times).
- Click the + button in the Tags section.
- Choose one or more tags from the list.
- Click Save Changes.
Remove an auto-applied tag
- In the same area, click the X next to the tag you want to remove.
- Click Save Changes.
⚠️ Only Primary Managers and Manager-level users can edit these settings. Agent-level and Lender-level users can view the settings but can't edit or remove them.
For a full walkthrough of creating, editing, and organizing the tags themselves before you assign them here, see Tags Manager: Adding, Editing, and Organizing Lead Tags.
Applies Account-Wide
Auto-tagging rules apply to every lead across the account. Any lead that performs the matching behavior receives the specified tag, regardless of which agent or team they're assigned to. Auto-tagging isn't user-specific; it can't be turned on for some agents or teams and off for others.
Best Practices
- Build tag-based smart filters on the Manage Leads page to surface high-intent leads at a glance. See Advanced Search and Smart Filters in the Leads Dashboard for how to set these up.
- Train your team to check tagged leads first in their daily workflow.
- Use consistent, descriptive tag names, like "Saved Listing" or "Viewed 3+ Times," so filters stay easy to read.
- Review your auto-tagging rules periodically as your lead engagement strategy evolves.
Troubleshooting Common Issues
-
Tags aren't applying to the leads you expect.
Confirm the behavior criteria were met exactly, for example, that the lead viewed the same property the required number of times. -
Agents can't change or remove an auto-applied tag.
Only Managers or the Primary Manager can make tag assignment changes. This is expected, not a bug.
FAQs
-
What counts as a "behavioral notification"?
Behavioral notifications are triggered when a lead takes a specific action that signals interest or re-engagement. These include: saving a listing, submitting a Request for More Info on a specific listing, submitting a Schedule Showing request, returning to the site after being away for 21 or more days, viewing the same property 5 or more times, clicking 3 or more listing alerts, and taking action while marked as a pond lead in Not Working status -
Can I apply multiple tags to a single behavior?
Yes. You can associate more than one tag with each notification type. -
Can I turn this off for some users or teams?
No. Auto-tagging applies to all leads across the entire account. -
Where do I manage the tags themselves, like renaming or deleting one?
Use the Tags Manager. See Tags Manager: Adding, Editing, and Organizing Lead Tags. -
How do I make sure my team actually sees a lead the moment it's tagged?
Pair auto-tagging with your notification preferences. See Lead Notification Settings: Email, Text, and In-App.